Tuesday, December 31, 2013

Using the Pinch Wheels on my Silver Bullet Cutter


                                       Using The Pinch Wheels

I have had a few inquiries about the rollers/pinch wheels on my Silver Bullet Cutter and hope this write up helps you.  I apologize I didn't have a fresh clean new mat for these photo's, but I do cut daily and alternate my mats. (meaning, I use all of them)    
 
My 18" Silver Bullet has 5 individual pinch wheels.  Before I bought my machine, I did a lot of research as I had never used a machine with these type of wheels.  As I do with everything: I over analyze.  I did see a few cutters available which have a lever for control of all of the wheels at once, but my concern was can I still cut if this lever malfunctions?  My thinking is if one thing controls all; then one thing breaks all.  Just a thought. 
 
 
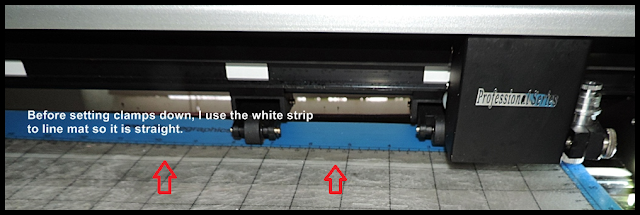
When I line up my mat, I use the white cutting strip as a guide line so it is straight before clamping the wheels down.  This is especially helpful to do before cutting a print n cut. 
 
 
You will move the wheels under the white guide lines on your machine. (See the red arrows above)  Look before you add your mat and you will see the rollers the wheels need to be over to move your mat when cutting.  The white guide lines make it easy to line up. 


 The picture above is showing the right side 3 of my 5 wheels.  I use 2 only most of the time for 8.5" x 11" and/or 12" x 12" paper or cardstock.  This is where the table accessory is handy, as it keeps your mat flat while cutting.  I use  .030 and thicker
8" by 11" chipboard sheets often for word books.  I use 3 wheels when cutting chipboard so my material won't move while cutting.  It didn't take me but a few cuts to be comfortable using this type of wheel.  I haven't cut vinyl yet, but I have no doubt how nice it will be to be able to cut the full 18" width! 

Judy Stark
Saturday, December 28, 2013

Welcome to my Blog - Creative Times & Cuts

 
Hello, my name is Judy Stark and I have been scrapbooking about 10 years using electronic cutting machines. I started with a Silhouette and progressed to a BossKut Gazelle.  The transition was a little scary at first, but I quickly learned and stayed with it.  I will never forget the day my BossKut Gazelle arrived and I placed it on my desk area.  I saw the blade wasn't anything like my Silhouette, looked at my friend and said, "oh, what have I done?"  My machine sat there for 2 weeks!  I finally got the courage to start cutting and never looked back.  And yes, I can now change my blade in the dark if need be.  My point?  Don't let change stop you!!  And don't be afraid to ask even the simplest of questions as I almost let the looks of a blade holder stop me. 

I am starting this blog in hopes of helping others learn their machine.  I  am going to keep posts basic and hopefully easy to follow.  I am not affiliated with any of the companies mentioned above. 

In August 2013, I decided I needed a new machine with more power as I was cutting hours daily.  I wanted to expand the types of media to cut with also.  After due diligence, I decided the 18" Silver Bullet was the perfect machine for my needs.  I was cutting 15 minutes after taking my machine out of the box!! 

Your Silver Bullet comes with a mat, blades, Scal 3 software and a few surprises.  The "surprises" show me they value customer satisfaction and go that extra mile.

The opening to fit the mat on the 18" machine is 22".
 
 I love having the larger than 12" work/cutting area!  Especially for vinyl projects and party supplies where you want longer wrappers etc. You will receive the right size mat with your machine but if you are cutting often, order a spare one.  That's Scrap,inc also has ReNu sheets for their mats.  Adhesive sheets you just rub onto your mat and they are great!  No spraying or adding wet glue to refresh your mats.  You can also use these on any other manufacture's mats.
 
Your machine will come with a regular blade holder but they also offer specialty blade holders such as the click blade holder and the detail blade holder.   I will talk more about the differences and other tools in future blogs.  IF you are not comfortable adjusting your blade, then I would suggest the click blade holder.
 
 
You also will want to consider the acrylic table accessory.  What a fabulous idea!  Expands your work area and keeps your mats, papers flat and straight as they are going through the cutting process.  Each set consists of front and back table piece. Projects approx. 6.5" beyond the machine.  VERY easy to install. No more propping up books. The Silver Bullet has plenty of speed, force and a lot quieter than many other machines. 
 
Thank you for stopping by my Blog and please check back often. 

Judy Stark